
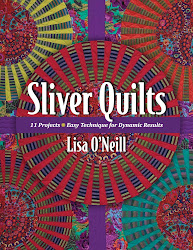
Here is Glinted Moss, an abstract interpretation of moss on the forest floor. The finished framed piece is 20 x 20 inches, the center main piece measures 17 x 17 inches.

Here's a close up view of the corner. I created the center quilt element as a completed quilt - it is composed of the quilt top, batting and a backing fabric - the backing fabric is the same as the fabric used for the frame treatment. I finished the quilted center using the pillowcase technique, adding my quilting after "pillowcasing" the top.

After completing the main quilted element I moved onto preparing the fabric for the framing wrapping treatment - I used a beautiful Stonehenge from Northcott. My frame in this case was a pre-stretched canvas frame that I had on hand. I calculated how large my frame wrapping fabric needed to be to cover the front of the frame and wrap around the back. I cut my piece of fabric, backed it with batting, and quilted it with a few different color threads - I did not quilt the center portion of this fabric since it will not be visible, nor did I use a backing fabric since it will not be visible.
After quilting I stretched the fabric over the frame and used my staple gun to fix it to the frame as you would if you were upholstering something.

Corners - my enemy. Next time I try this I plan to go to my framing store to have the framer show me how to handle the corners - I really want to make them sit flatter. This was my first attempt using this framing technique - I decided I did not like the unfinished edge so I made some changes in my next piece.

Here's The Summer Still - it measures 10 x 12 inches finished, the center main quilted element measures 8 x 10 inches. For this piece I used stretcher bars to create the framing structure.

I created the center element as above using the pillowcase method to finish the edges; however in this piece I did all of my quilting on the top / batting portion of the quilt, prior to pillowcasing. I was trying to create a degree of depth to this piece so I chose to use black fabric as the backing for the center element and was very happy with the shadowing effect.

As you can see, I pieced the frame wrapping fabric. Initially I was going to try to match the wrapping piecing to the main element piecing, but after auditioning the process decided I could achieve more depth by not matching the piecing lines.
When it came to quilting the frame wrapping fabric I used batting, and in this case chose to use a backing fabric since it would be visible on the back of the piece. This piece was small so I quilted the entire piece, including the center portion - it was just easier.

I refined my stapling technique in The Summer Still by allowing enough fabric so that I could turn the edges under, avoiding the raw edges on the back of the frame.

Attaching the main quilting element - this applies to both examples - Once I had the frame treatment applied to the frame I then attached the main quilting element to the framing fabric by hand applique. I think it would be very difficult - next to impossible - to attach the main quilting element to the framing fabric before stretching it to the frame - it would never end up being centered. There you have it - my developing framing process. You are definitely going to see more of this from me - I really like the finished look.
Now for a great party menu. We had a bunch of family over on Sunday for dinner and I made a great menu that I wanted to share with you. I actually think there was an element of clairvoyance in my menu development. I was not following the soccer world cup - had no idea who was playing in the finals - yet I chose to make a Spanish themed menu, and low and behold, Spain won. Cool - wonder what else I could predict with my menus?
My whole dinner was based on a recipe from Brian Boitano - yes, the skater, turned Food Network host. About a year ago I caught his show and saw him make paella burgers and thought they sounded so delicious. Here they are - they were fantastic - we devoured them!!! They are made with ground chicken, chorizo (a spicy sausage) and scallops, along with other seasonings - fantastic and so simple. They were to have been grilled, but 5 minutes into the grilling process the gas ran out - so into the saute pan for finishing - actually 3 saute pans - I was feeding a crowd.
 Now I know I promised lots of photos - but what can I say - I enjoy my company too much, and a lot of peach sangria had mysteriously disappeared ... sorry!
I used my Tapas cookbook from Penelope Casas for a few of the recipes - this is hands down the best tapas cookbook available - I've had it for years - it's falling apart from overuse - everything in it is amazing. If you can find it - buy it!

Here's the menu:
Beverage
Peach Sangria
Appetizers
Squash Blossoms stuffed with Lemon Basil Brebis
Fried Okra
Swiss Chard Canape
Pickled Carrots (from my last post - they're history - my nieces loved them!)
Dinner
Paella Burgers with Pimento Mayonnaise
done "shooter style"
Vegetable Salad in Romesco Sauce (Tapas)
Anise Flavored Beet Salad (Tapas)
Dessert
A Duo of Granitas - both from Granita Magic
Peach Granita
Saffron, Cardamom and Honey Granita


No comments:
Post a Comment