skip to main |
skip to sidebar
Hands down, when I was a child one of my favorite toys was the Spirograph. I could spend hours making all sort of doodles with those spinning rings.  I was delighted to learn that I could use my Bernina Circular Embroidery Attachment in much the same way I used my Spirograph to create interesting quilting designs. This is a relatively cheap attachment, under $30.
 This photo shows how it attaches to your machine.
 This pin anchors your fabric to the attachment. It is protected by this plastic stopper. It is sharp, and it hurts when you forget it is there and stab yourself on it - be certain to use the protective plastic stopper.
 You can adjust the size of the circle by sliding the needle position along the attachment.
 While there are grooves to set the position of the slide, they do not lock it in place. I use a piece of masking tape to prevent the slide from moving while I am sewing.
  To use the attachment to make my Spirograph design, first find the center of your fabric. This is a fabric sandwich (top, batting, and back) that I have folded and creased at the center.
 Anchor your fabric on the pin of the attachment. The pin should come through the fabric at the center marking crease. Replace to the plastic stopper to hold the fabric in place and to protect your fingers. This whole sport of sewing can be quite dangerous!
 You want to be certain that the area of fabric between the pin and the foot of the sewing machine is smooth and flat, and not bunched up to ensure you get a perfect circle.
 Then all you have to do is sew. I used a simple straight stitch here, but you could use your decorative stitches as well. For added interest you can also consider using a double to triple needle. Here is a finished circle.
 Now let's Spirograph. I'm sure there is some exacting geometric or trigonometric language I could use here, but I simply don't know what that might be. Let's just keep it simple. Move your fabric to allow the pin to come through at a point on the perimeter of the circle - be careful not to pierce the sewing thread to avoid breakage of the thread.
  Now sew another circle - exactly the same size as the first circle. It is important the you keep your fabric smooth and flat as it spins on the pin, particularly at the point where the second circle intersects the first circle.
 Now all you are going to do is to continue sewing additional circles around the first circle, using the intersection of the circles as the new center pin point. Simply move the fabric so the pin comes through at the intersection point of the two circles as indicated below by the point of the stiletto. Sew this circle and then move to the next intersection.
  In progress, center circle with 3 surrounding circles.
 And here's the completed Spirograph created using the Bernina Circular Embroidery Attachment. It is easy here to see the center circle, surrounded by 6 circles, creating a Spirograph-ic design.
  Think of the possibilities. You can continue to grow your design by continuing outward. Have fun with your threads - mix up the colors, weight and stitch length. Play with those beautiful decorative stitches you have on your machine. Add smaller circles at the intersection points. Get creative!

 This photo shows how it attaches to your machine.
 This pin anchors your fabric to the attachment. It is protected by this plastic stopper. It is sharp, and it hurts when you forget it is there and stab yourself on it - be certain to use the protective plastic stopper.
 You can adjust the size of the circle by sliding the needle position along the attachment.
 While there are grooves to set the position of the slide, they do not lock it in place. I use a piece of masking tape to prevent the slide from moving while I am sewing.
  To use the attachment to make my Spirograph design, first find the center of your fabric. This is a fabric sandwich (top, batting, and back) that I have folded and creased at the center.
 Anchor your fabric on the pin of the attachment. The pin should come through the fabric at the center marking crease. Replace to the plastic stopper to hold the fabric in place and to protect your fingers. This whole sport of sewing can be quite dangerous!
 You want to be certain that the area of fabric between the pin and the foot of the sewing machine is smooth and flat, and not bunched up to ensure you get a perfect circle.
 Then all you have to do is sew. I used a simple straight stitch here, but you could use your decorative stitches as well. For added interest you can also consider using a double to triple needle. Here is a finished circle.
 Now let's Spirograph. I'm sure there is some exacting geometric or trigonometric language I could use here, but I simply don't know what that might be. Let's just keep it simple. Move your fabric to allow the pin to come through at a point on the perimeter of the circle - be careful not to pierce the sewing thread to avoid breakage of the thread.
 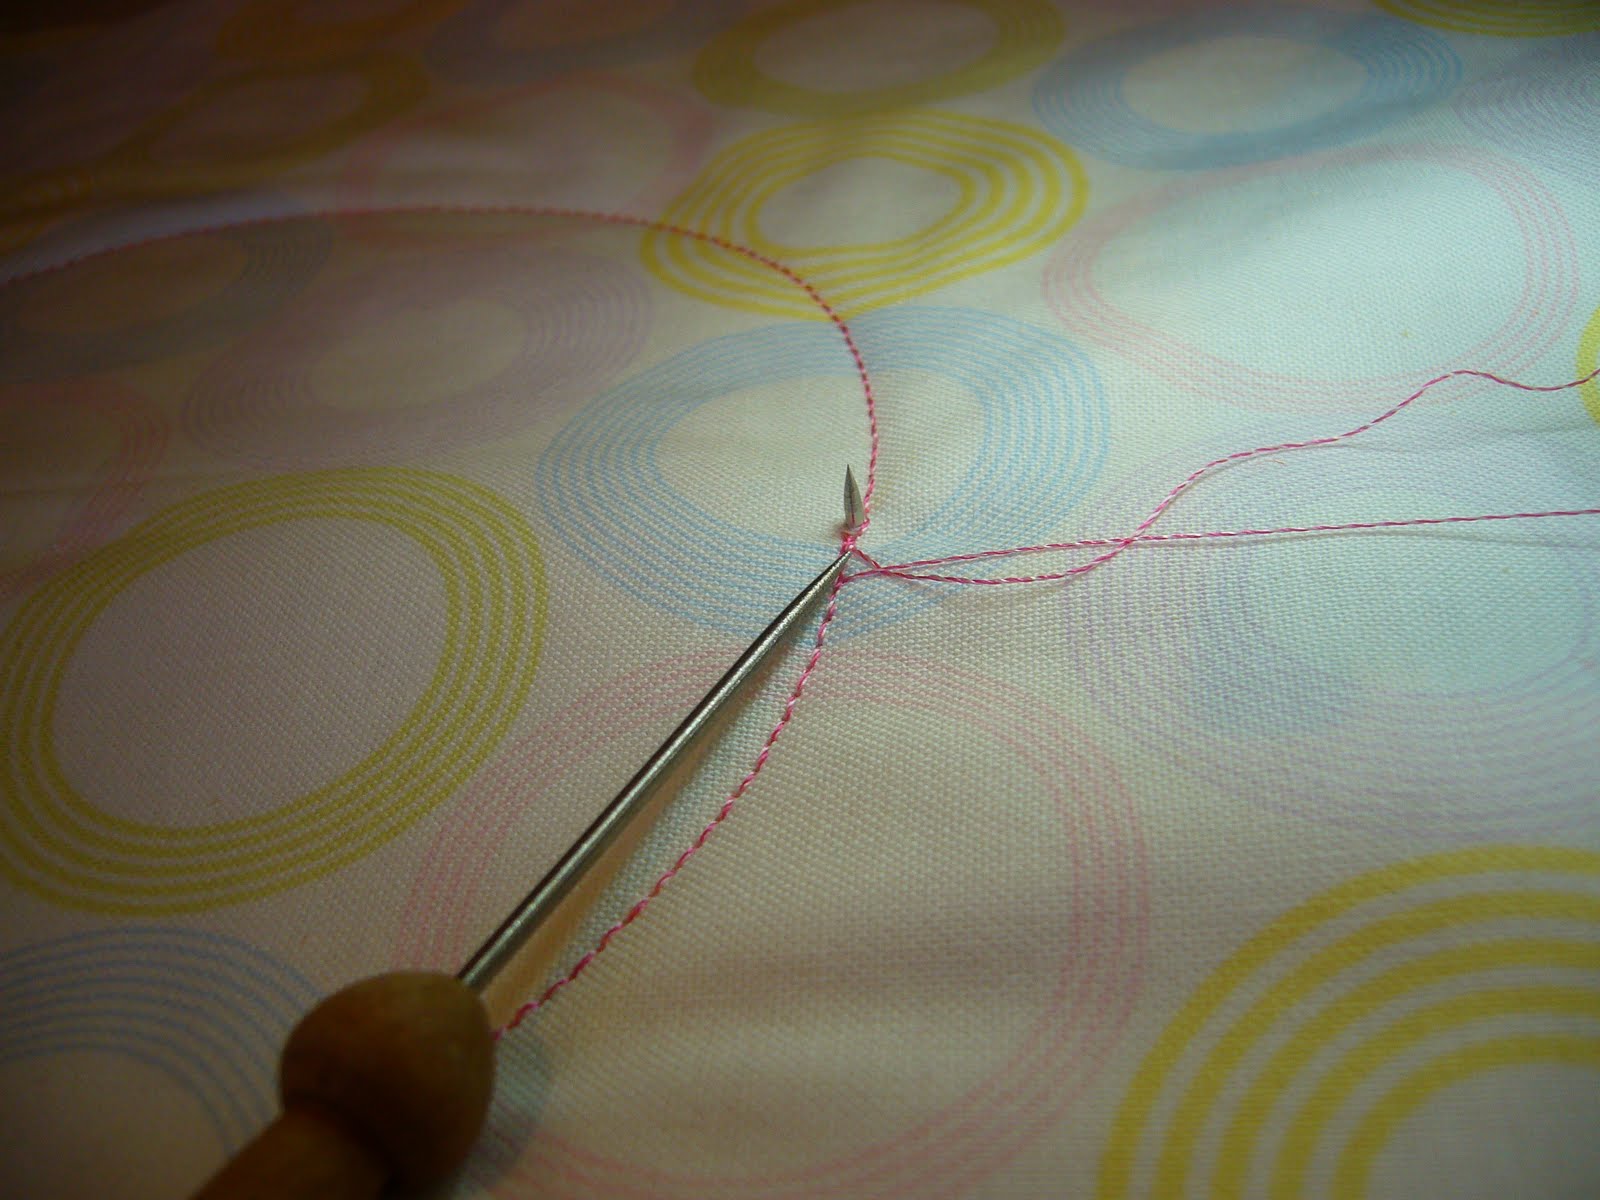 Now sew another circle - exactly the same size as the first circle. It is important the you keep your fabric smooth and flat as it spins on the pin, particularly at the point where the second circle intersects the first circle.
 Now all you are going to do is to continue sewing additional circles around the first circle, using the intersection of the circles as the new center pin point. Simply move the fabric so the pin comes through at the intersection point of the two circles as indicated below by the point of the stiletto. Sew this circle and then move to the next intersection.
  In progress, center circle with 3 surrounding circles.
 And here's the completed Spirograph created using the Bernina Circular Embroidery Attachment. It is easy here to see the center circle, surrounded by 6 circles, creating a Spirograph-ic design.
  Think of the possibilities. You can continue to grow your design by continuing outward. Have fun with your threads - mix up the colors, weight and stitch length. Play with those beautiful decorative stitches you have on your machine. Add smaller circles at the intersection points. Get creative!


4 comments:
This is really cool! I have this attachment but have not yet used it. What a great idea for simple outline quilting. I'd forgotten about the spirograph. Hours and hours of fun when I was a kid - we must be from the same generation!
Brilliant! I wonder if my Viking comes with something similar!
I've given you a Versatile Bloggers Award...I'm not sure you're into things like that but I thought it a good opportunity to introduce your blog to my readers.
Miri
http://milkandhoneyquilts.blogspot.com/2010/08/punch-needle-project-and-award.html
i'm so glad i stumbled onto your blog! You keep offering useful info and lovely photos. You've actually helped solve a little problem i had - my brother wanted me to make him a sacred geometry quilt, with lots of circles, and being a very amateur quilter i had no idea how to easily accomplish this. Problem solved! i didn't even know this device even existed. Thanks again! i'm adding you to my blog roll; i'll be back for sure.
Oh, and i loved my spirograph, too - i was just thinking the other day that i'd like to get another set for me and my son.
Spirograph. One of the greatest toys ever created. There were a lot of other toys from that same era like Etch-a-Sketch, Slinky, and Lite.Brite that didn't really live up to their promise, but Spirograph was exceptional.
Post a Comment